TargetableModule
A module that third party code can modify.
When Webpack loads a module into its bundles, it processes the source code through a set of rules generated by Buildpack. A TargetableModule is a reference to that source file, meant to be passed to interceptors. Inside interceptors, extensions and projects can configure the TargetableModule to transform it in many ways.
- TargetableModule
- new TargetableModule(file, trackingOwner)
- .addTransform(type, transformModule, options) ⇒
this - .flush() ⇒
Array.<TransformRequest> - .insertAfterSource(after, insert, [options]) ⇒
this - .insertBeforeSource(before, insert, [options]) ⇒
this - .prependSource(insert) ⇒
this - .spliceSource(instruction) ⇒
this
Create a TargetableModule representing a file.
Parameters
| Name | Type | Description |
|---|---|---|
| file | string |
Path to the underlying source file. |
| trackingOwner | Trackable |
Parent object for debugging purposes. |
Add a transform request to this module’s queue. The fileToTransform of
the transform request is automatically set to this module’s filename.
Chainable
Returns: **
**Parameters
| Name | Type | Description |
|---|---|---|
| type | TransformType |
Transform type |
| transformModule | string |
The Node module that runs the transform, such as a Webpack loader for type source or a Babel plugin for type babel. |
| options | Object |
Configuration object to send to the transformModule. |
Empty this module’s queue of transforms, returning them as an array.
**Returns: **
Array.<TransformRequest>
— An array of Transform requests.
Insert text into the module contents, immediately following the location of the search string if it is found.
Chainable
Returns: **
**Parameters
| Name | Type | Description |
|---|---|---|
| after | string |
Text string in the module code to place the new content after. |
| insert | string |
Text to insert after the search string. |
| [options] | Object |
Additional loader options. |
| [options.remove] | number |
Number of characters to delete forward, after the search string. |
Insert text into the module contents, immediately before the location of the search string if it is found.
Chainable
Returns: **
**Parameters
| Name | Type | Description |
|---|---|---|
| before | string |
Text string in the module code to place the new content before. |
| insert | string |
Text to insert before the search string. |
| [options] | Object |
Additional loader options. |
| [options.remove] | number |
Number of characters to delete forward, after the search string. |
Add text to the beginning of a file.
Chainable
Returns: **
**Parameters
| Name | Type | Description |
|---|---|---|
| insert | string |
Text to insert up top |
Do any splice operation supported by splice-source-loader.
Chainable
Returns: **
**Parameters
| Name | Type | Description |
|---|---|---|
| instruction | object |
Splice instruction. |
Source Code: pwa-studio/packages/pwa-buildpack/lib/WebpackTools/targetables/TargetableModule.js
Examples
Code examples for using the TargetableModule class.
Insert source code
The TargetableModule class contains functions that let you insert custom code into different areas in the source code.
const { Targetables } = require('@magento/pwa-buildpack')

module.exports = targets => {
    const targetableFactory = Targetables.using(targets);

    // Create a TargetableModule instance that points to the main.js source
    const MainComponent = targetableFactory.module(
        '@magento/venia-ui/lib/components/Main/main.js'
    );

    // Insert a console log message in the source
    MainComponent.insertAfterSource(
        'const Main = props => {\n',
        '\tconsole.log("Hello World");\n'
    );

}
The following example makes the following code modifications to main.js for the final bundle:
  const Main = props => {
+     console.log("Hello World");
      const { children, isMasked } = props;
      const classes = useStyle(defaultClasses, props.classes);

      const rootClass = isMasked ? classes.root_masked : classes.root;
      const pageClass = isMasked ? classes.page_masked : classes.page;

      useScrollLock(isMasked);

      return (
          <main className={rootClass}>
              <Header />
              <div className={pageClass}>{children}</div>
              <Footer />
          </main>
      );
  };
Splice code using instructions
The spliceSource() function is a low level code modification function that apply changes based on an instruction object.
The insertAfterSource(), insertBeforeSource(), and prependSource() functions provide a simpler interface and are facade functions for spliceSource().
The first three functions can handle most modification use cases, but if you need to use spliceSource() to make changes, you must know how to create a splice instruction object.
Splice instruction object
A splice instruction object tells the spliceSource() function, how to change the source code.
The instruction object properties describes what actions to take and where.
| Property | Type | Description |
|---|---|---|
insert |
string | The string to insert at the specified position |
remove |
integer | The number of characters to remove after a specified position |
at |
integer | The character index to apply the code change |
before |
string | Code changes are applied at the start of this string in the code |
after |
string | Code changes are applied to the end of this string in the code |
Instruction objects can only have one location property (at, before, after), but one or both action properties (insert, remove).
Splice instruction examples
Example 1: The following instruction object makes the same modification as the previous Insert source code example:
const instruction = {
    insert: '\tconsole.log("Hello World");\n',
    after: 'const Main = props => {\n'
}

MainComponent.spliceSource(instruction);
Example 2: This instruction object adds a comment after the default export statement in main.js:
const instruction = {
    after: 'export default Main;',
    insert: ' // Exports the main component',
}

MainComponent.spliceSource(instruction);
Example 3: These instructions add and remove code to refactor main.js so it destructures variables earlier in the code:
const destructureInstruction = {
    before: 'props =>',
    remove: 5,
    insert: '({ children, isMasked, propClasses })'
}

MainComponent.spliceSource(destructureInstruction);

const removeInstruction = {
    before: ' .   const { children, isMasked }',
    remove: 42
}

MainComponent.spliceSource(removeInstruction);

const rewriteInstruction = {
    after: 'useStyle(defaultClasses, ',
    remove: 7,
    insert: 'propC'
}

MainComponent.spliceSource(rewriteInstruction);
Debugging source transformations
Debugging source transformation issues is tricky because the code you want to check will be in chunks and minified. Fortunately, PWA Studio’s Webpack configuration provides source maps for Chrome’s developer tools, which lets you view the modified code in your browser.
Debugging with Chrome developer tools
- Start your development server and navigate to a page in your application that contains your modified code.
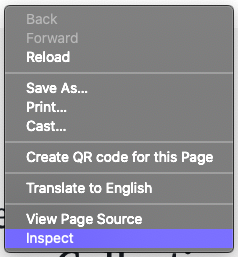
-
Right-click on the page and select Inspect to open Chrome’s web developer tools.
-
Select the Sources tab in the developer tools panel.
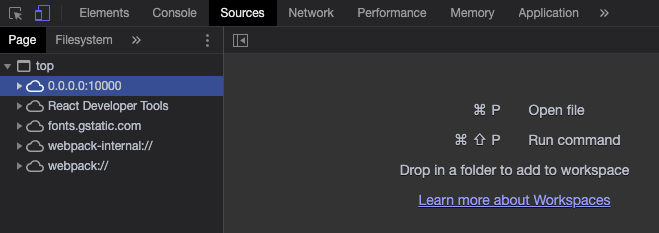
-
Open the file searcher by pressing
Command+Pon a Mac, orContol+Pon Windows or Linux.Type in the name of the file you modified, e.g.
main.js.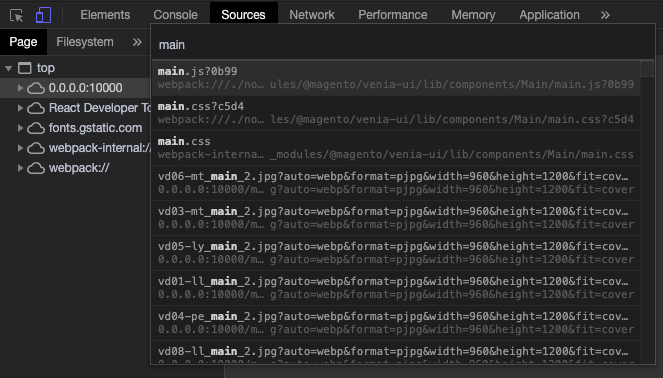
-
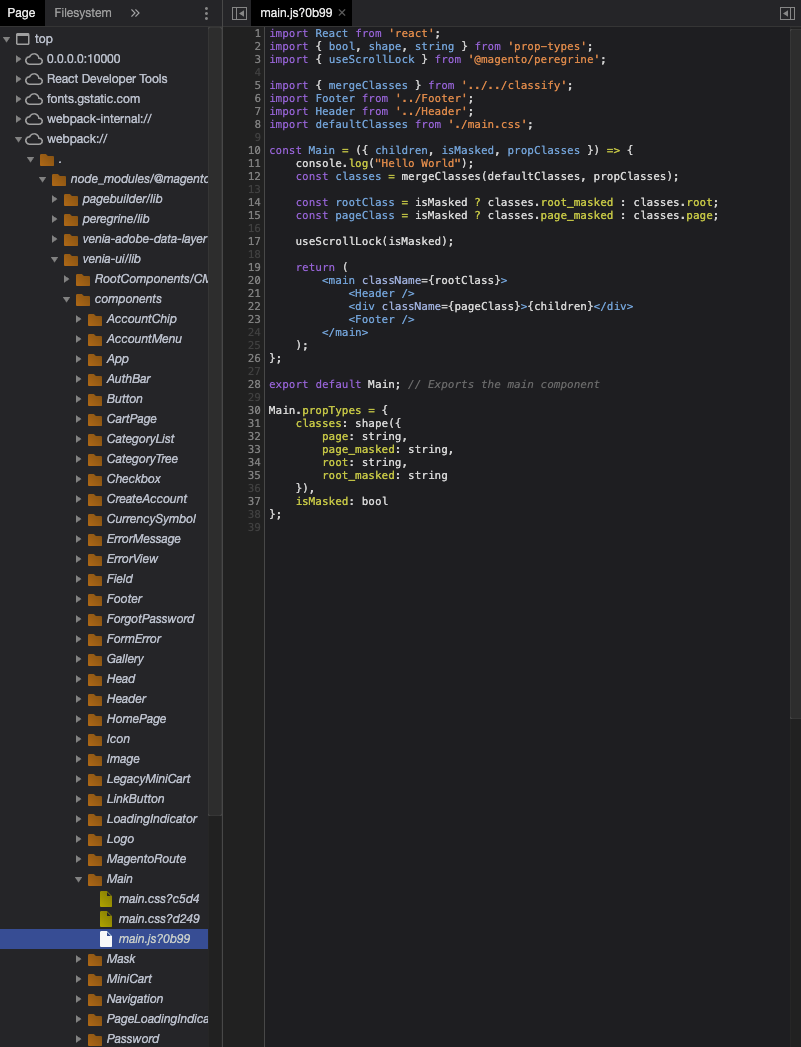
After the file opens, look for your modifications and validate that they are correct.
Here, you see the result of the modifications from the previous examples: